NodeMCU and TEMPERATURE AND HUMIDITY SENSOR with Oled display ( ESP8266 or ESP32 )
 Click Here to View Step by Step
Learn how to display temperature and humidity readings from a DHT11/DHT22 sensor model in an SSD1306 OLED display 128*64 using an ESP32 or an ESP8266 with Arduino IDE
Project description :
Real-time temperature and humidity display readings work by USB Cable 5V, It can be used for both indoor and outdoor measurements.
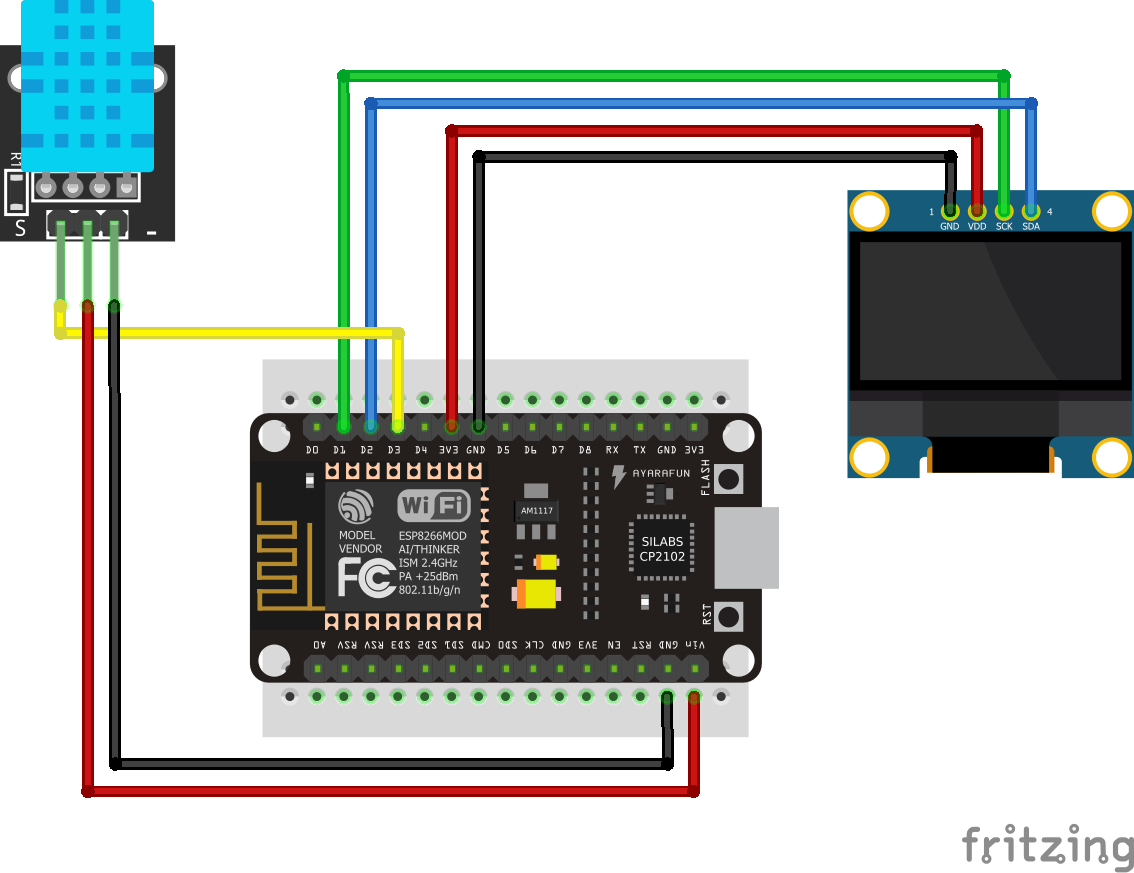
Connection :
TEMPERATURE AND HUMIDITY SENSOR MODULE working 5 V and signal On D3
OLED display working 3.3V and SCK on 1D and SDA On 1D
#include <SPI.h>
#include <Wire.h>
#include <Adafruit_GFX.h>
#include <Adafruit_SSD1306.h>
#define SCREEN_WIDTH 128
#define SCREEN_HEIGHT 64
Adafruit_SSD1306 display(SCREEN_WIDTH, SCREEN_HEIGHT, &Wire, -1);
int DHpin = D3; // input/output pin
byte dat[5];
byte read_data()
{
byte i = 0;
byte result = 0;
for (i = 0; i < 8; i++) {
while (digitalRead(DHpin) == LOW); // wait 50us
delayMicroseconds(30); //The duration of the high level is judged to determine whether the data is '0' or '1'
if (digitalRead(DHpin) == HIGH)
result |= (1 << (8 - i)); //High in the former, low in the post
while (digitalRead(DHpin) == HIGH); //Data '1', waiting for the next bit of reception
}
return result;
}
void start_test()
{
digitalWrite(DHpin, LOW); //Pull down the bus to send the start signal
delay(30); //The delay is greater than 18 ms so that DHT 11 can detect the start signal
digitalWrite(DHpin, HIGH);
delayMicroseconds(40); //Wait for DHT11 to respond
pinMode(DHpin, INPUT);
while(digitalRead(DHpin) == HIGH);
delayMicroseconds(80); //The DHT11 responds by pulling the bus low for 80us;
if(digitalRead(DHpin) == LOW)
delayMicroseconds(80); //DHT11 pulled up after the bus 80us to start sending data;
for(int i = 0; i < 5; i++) //Receiving temperature and humidity data, check bits are not considered;
dat[i] = read_data();
pinMode(DHpin, OUTPUT);
digitalWrite(DHpin, HIGH); //After the completion of a release of data bus, waiting for the host to start the next signal
}
void setup()
{ display.begin(SSD1306_SWITCHCAPVCC, 0x3C);
display.clearDisplay();
// Display Text
display.setTextSize(1);
display.setTextColor(WHITE);
display.setCursor(5,0);
display.println(" TEMPERATURE ");
display.display();
display.setTextSize(1);
display.setTextColor(WHITE);
display.setCursor(5,28);
display.println(" & HUMIDITY ");
display.display();
delay(2000);
Serial.begin(9600);
pinMode(DHpin, OUTPUT);
}
void loop()
{
start_test();
Serial.print("Humdity = ");
Serial.print(dat[0], DEC); //Displays the integer bits of humidity;
Serial.print('.');
Serial.print(dat[1], DEC); //Displays the decimal places of the humidity;
Serial.println('%');
Serial.print("Temperature = ");
Serial.print(dat[2], DEC); //Displays the integer bits of temperature;
Serial.print('.');
Serial.print(dat[3], DEC); //Displays the decimal places of the temperature;
Serial.println('C');
byte checksum = dat[0] + dat[1] + dat[2] + dat[3];
if (dat[4] != checksum)
Serial.println("-- Checksum Error!");
else
Serial.println("-- OK");
delay(1000);
// Clear the buffer.
display.clearDisplay(); // Display Text
display.setTextSize(1.5);
display.setTextColor(WHITE);
display.setCursor(10,3);
display.println( "Humdity = "+ String(dat[0], DEC) +"."+ String(dat[1], DEC) +"%"); display.display();
display.setTextSize(1.9);
display.setTextColor(WHITE);
display.setCursor(10,28); display.println( "Temp. = "+ String(dat[2], DEC) +"."+ String(dat[3], DEC) +"C");
display.display();
delay(2000);
}
Can be added:
Real-time clock and alarm system it`s very easy and can be read by smartphones with wifi.